How to Use Data Validation in MS Excel
MS Excel has huge number of users over the world and these numbers are increasing day by day because every time it comes with new features. People use the excel sheet to maintain the data in a good manner. Have you ever tried to apply the validation on the cell? If your answer is no, then read this blog to know about validation option in MS Excel.
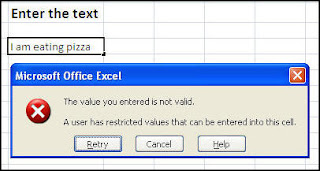
Suppose, you want to set the validation (restriction) on a cell that, when someone is trying to enter a data which is more than 15 characters or against the validation then, it will throw an error in the screen to warn the user.
Steps to add validation:
Step 1: Click on the Data tab. Unser the Data Tools option, Data Validation option is available.


Suppose, you want to set the validation (restriction) on a cell that, when someone is trying to enter a data which is more than 15 characters or against the validation then, it will throw an error in the screen to warn the user.

Steps to add validation:
Step 1: Click on the Data tab. Unser the Data Tools option, Data Validation option is available.

Step 2: Now select the cell which you want to validate. Click on the Data Validation option. When you will click on this option then, a window will appear on the screen with the different validation option. This window looks like this:

You can see the different validation options in this window:
- Setting
- Input Message
- Error Alert
Setting: In this option, you can choose the different options for the validation like: Text, Decimal numbers, Date, Time, List and Whole number etc. I am choosing the Text length option from the list and set the minimum value is 1 and the maximum value is 10.

Click on the OK button. Now try to enter the data in the cell.
Input Message: If you want to show the message on the cell at the time of entry then, you can choose this option. It’s not a mandatory option. This section has two fields: Title and Input Message. Just write the message and click OK to save it.
Error Alert: With this option, you can create your own error message. Enter title and message according to your validation. It has three symbols: Stop, Warning and Information.
It is the Stop message. You can try the other option by selecting them from the list.
Conclusion: We have seen the different data validation options. Always choose a meaningful title and message which explains the validation and restrictions perfectly. This is the easiest way to create the error messages in MS Excel.


Comments
Post a Comment